Let’s take a look at the inside of the toothbrush. My attempts at disassembling the Philips Sonicare HX6220 electric toothbrush (3000 series).
I received a broken Philips toothbrush, and I decided to try to revive it at all costs. There weren’t many videos online, and they mostly didn’t explain the principle of disassembly, so I had to take matters into my own hands. And somehow I managed to do it, slightly cutting the body. To make your disassembly more accurate, I offer you some photos of the insides of this device.
Two brushes arrived. One turned out to be fully functional and charged, but the second one completely refused to accept a charge. A typical problem for such brushes is a failed battery. In more modern models, a lithium battery is installed, in simpler ones, apparently to save money, Ni-MH batteries are installed. From this we can assume that models in the cheaper segment have lower performance and operating time. Be that as it may, we are interested in the reason for the failure. And we will try to find it.
 This is what the charging core looks like, pulled out of the housing. Please note that the main fastening element is a white plastic clip, the protruding parts of which fit directly into the grooves of the brush housing. They are more clearly visible in this photo.
 When removing it, you need to be careful, because you can break the charging wires, which happened to me. Charging is wireless, something like an induction coil:
 Inside we find this wonderful power supply:
 The batteries on one side are connected in series with each other:
 On the other hand, the batteries are soldered to the board with these contacts:
 If desired and with straight hands, the battery can be easily noticed as something like a pair of AAA battery, which completely replace the native battery.
 The main part of the body is occupied by the engine. The rubber bands (black in the photo) are made of an interesting material, which is supposed to reduce vibration. It feels like something between plastic and rubber.
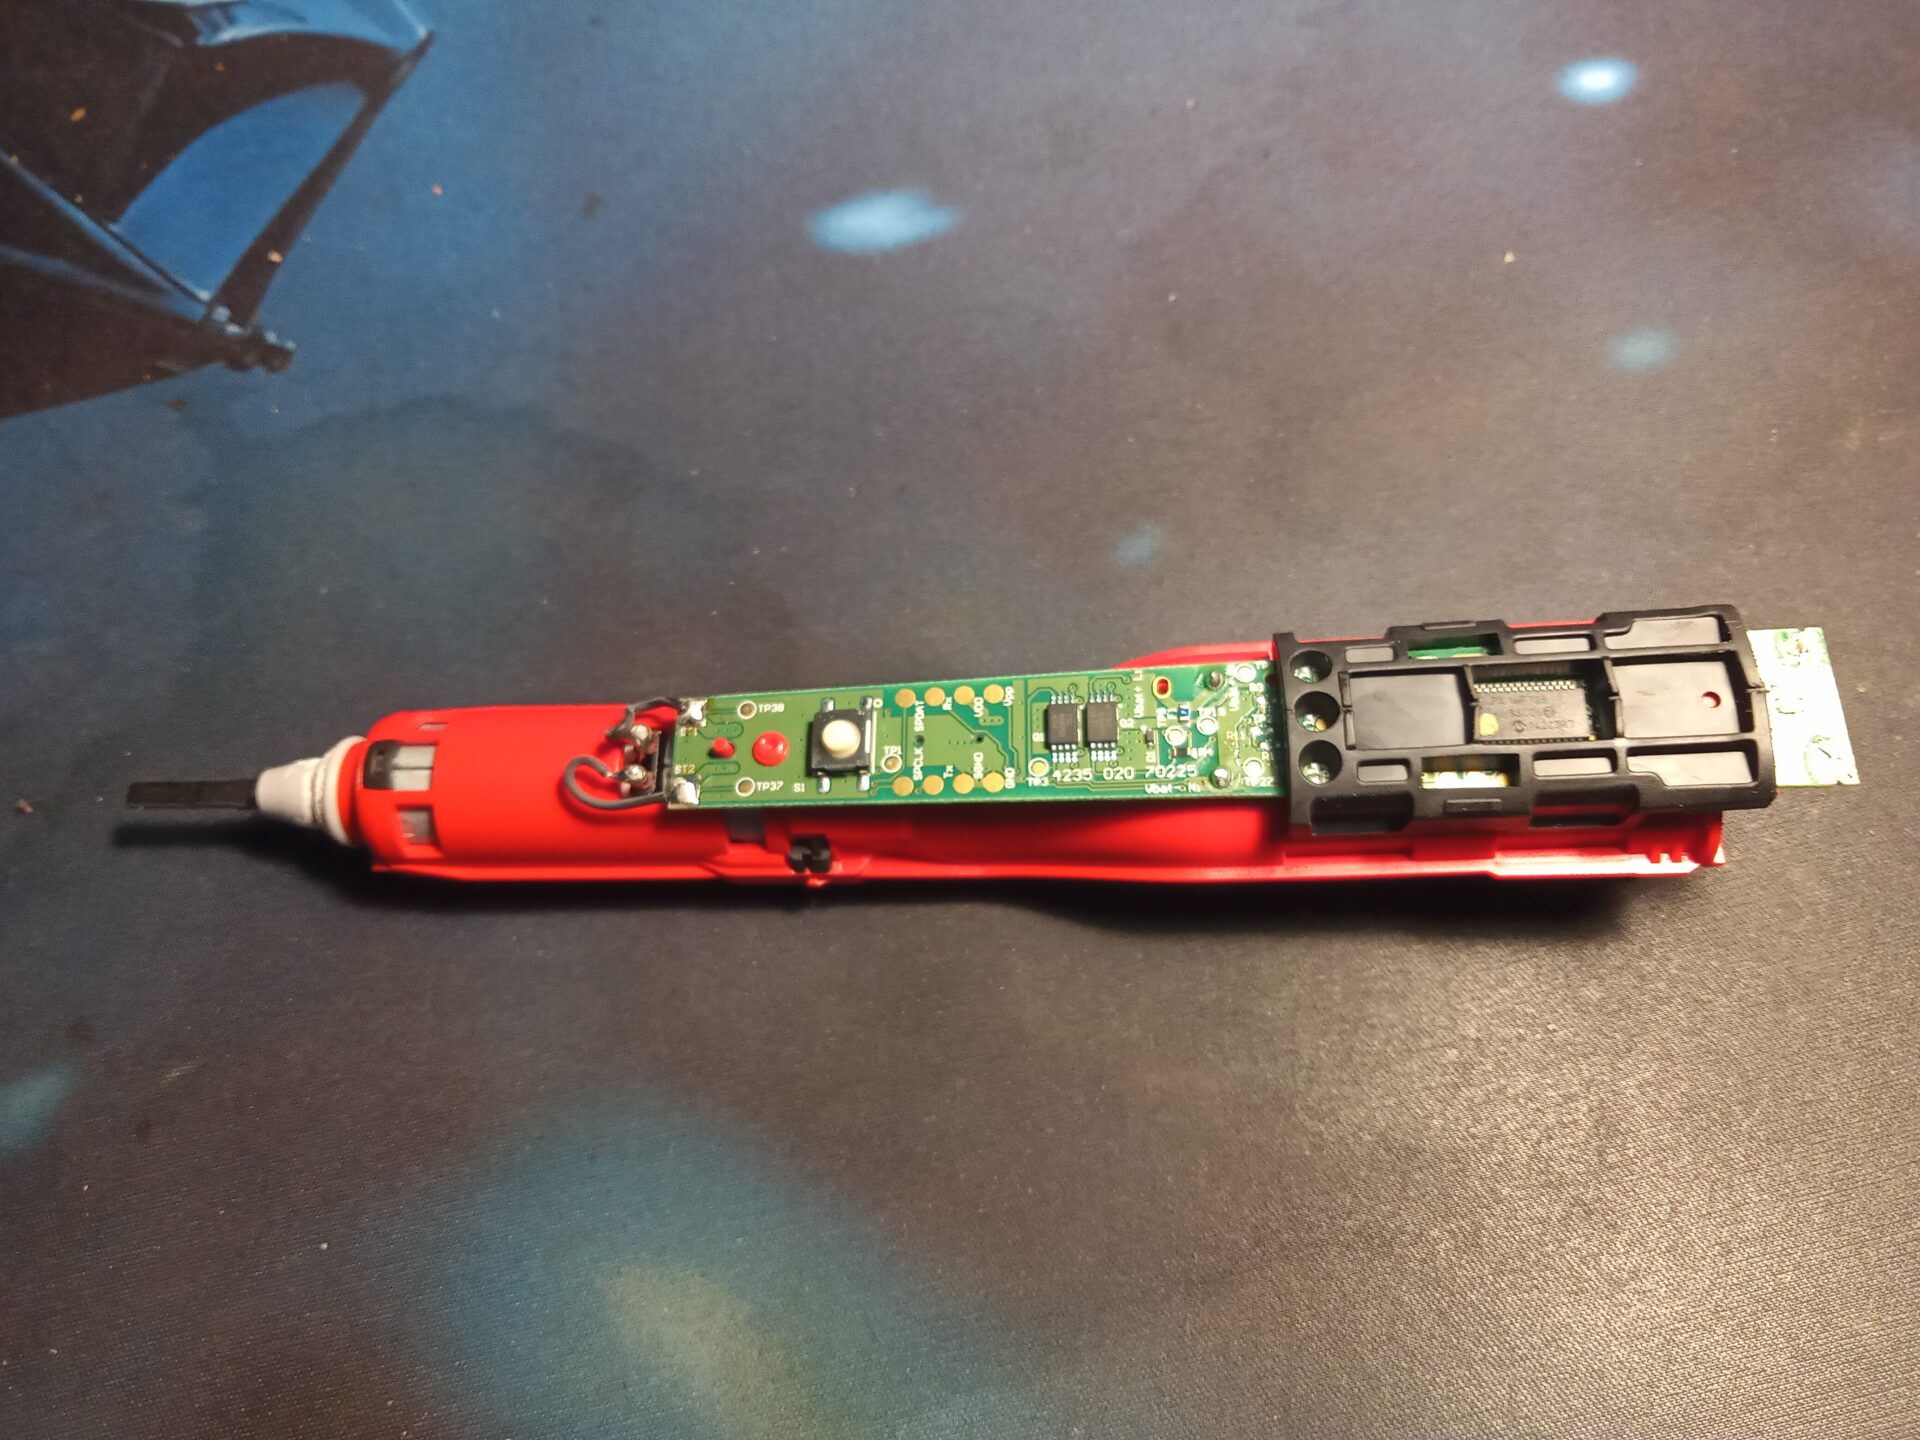
 On the other side is a board with a button, a pair of microcircuits and contacts. Judging by the name of the contacts, such brushes (possibly) can be flashed and, as an option, expand the functionality. I was not interested in this topic and did not look online, but it would be strange if the contacts were displayed for updating the firmware.
 From the side, the brush looks like this. As you can see, there is nothing special, but this model is one of the simplest of its kind, so the functionality and body are very minimalistic.
 One of the battery cells showed a charge of 1.35 volts, the second one showed almost no charge at all. Apparently, for some reason one of the batteries was discharged to zero, while the second one remained alive. We decided to try to “start” the battery by charging it on a smart charger.
 After an hour, the battery absorbed 198 mAh, its voltage became completely normal, the battery accepts a charge. In 335 minutes, the battery gained 1060 mAh of capacity and continued to charge.
 What is interesting is that for 14 USD on Amazon you can order a compatible battery, which has a capacity of 800 mAh. Either the compatible battery has a smaller capacity, or the native one has been recharged. In any case, at a capacity of 1090 mAh, I decided to stop charging.

Also in the picture you can see information that the specified battery is applicable to brushes that have a bolt at the bottom in place of the charging socket (presumably for easy removal of the core and replacement of the battery). In my case, there is no bolt, which means that there is no guaranteed problem-free repair of this brush (without consequences for the body).
Reverse assembly
The reverse assembly turned out to be very interesting. The fact is that the lid is attached to the main part of the brush body with latches.
 This design gives the impression that the brushes are not designed for disassembly at all, because it is practically impossible to repair it without leaving any traces.
 It all comes down to the fact that you will most likely leave marks on the body somewhere, which is unlikely to affect the functionality of the brush, but at the same time will still spoil the appearance.
 Having cleaned the contacts with a knife (copper wire always has a varnish coating to protect against short circuits), I soldered them in place. I also soldered the battery contacts. Everything turned out to be much easier with it than I thought (it is very inconveniently soldered to the board).
 When reassembling, the latches entered their grooves and tightly closed the housing. Again, this picture allows you to clearly see which side these two latches are in the housing. From the sound with which the housing closed, it seemed that the housing of these brushes is a consumable. Therefore, the evidence may be the fact that such brushes can be found completely new in the refurbished state . This term means that the product being purchased, although it looks like new, has been restored from a non-working state. I dare to assume that under warranty they most often change the failed batteries, so, as an option, the housing is also changed immediately. In any case, our brush is restored and can continue to work.

Result
What is the result of charging and restoring one of the batteries on a smart charger? The battery came to life, the brush works, and there were no additional costs for replacing the batteries. However, instead of a battery from Amazon, I would rather just buy two mini-finger batteries (as an option, from the same company as the brush) and with a light movement of the hand, soldering them together, solder them into place. It is unlikely that the original battery has any incredible properties, because on the same Amazon you can find many reviews about how the brushes stop working after a year or two. From the good news – in Ukraine, these products have a two-year warranty, from the bad – after three years you will still have to climb inside.
How long are the batteries of these brushes potentially enough? Let’s do the math. The review of this brush states that its charge lasts for 13-15 days. NiMh cells under ideal conditions can survive about 300-500 charge-discharge cycles. So, 15 * 500 = 7500. Under ideal conditions, the battery should survive 7500 days of use or 20.5 years. In fact, either the batteries “mow”, or something else fails (motor?), And in two warranty years you can easily get into repairs. If you consider that every 3-4 years you need to buy a new brush, plus the cost of nozzles, you can conclude that “dental care” is not always cheaper than their treatment. But this is just statistics, and everyone decides for themselves how much their health is worth. I bow to this. 🙂

Author: Sa Crea
Hellmin
Discover more from I become a Creature
Subscribe to get the latest posts sent to your email.